How to setup a php twitter application

Demo description:
- application name : php-twitter
- programming language use : PHP
- database use : MYSQL
- source code : https://github.com/kofix-ml/php-tweet
1. Setting up our project environment
since we are gonna deploy a php project, i would suggest using a server which has php builds such as:
- MAMP - for mac (https://www.mamp.info/en/downloads/)
- LAMP - for linux (https://bitnami.com/stack/lamp/installer)
- WAMP - for windows (http://www.wampserver.com/en/)
- XAMPP - for windows (https://www.apachefriends.org/download.html)
- LEMP - for linux (https://lempstack.com/download/)
and all other stack builds that has php server in it. its up to you which one you wanna use. Start any of the application above and you are ready to go.
However, if you prefer using php build in server also can. But please remember to serve it every time you wanna test it, this can be done with simple php native command :
php -S <addr>:<port>
in our case we will be using our localhost(bind to any port you like) :
php -S localhost:8000
I will be using port 8000 as it is a common practice, but its up to you which port you want to use for this tutorial.
2. Download the project template
The project is located at https://github.com/kofix-ml/php-tweet
Our first step would be to download/clone this repository https://github.com/kofix-ml/php-tweet. Now since the repository is located/hosted at github, you can do this by using the github desktop clone mechanism :

Or you can also use the git available command :
git clone https://github.com/kofix-ml/php-tweet.git
if the clone is successful, you should get a project folder like this (can open in any text editor you want, though im using sublime 3):

and you can go to your browser http://localhost/ and preview it. if you bind it to specific port, please specify the port also in the browser for example : http://localhost:8000/
It should be redirecting you to the /login where you have to login or register before going to the index/main page.

If you get something like the above then you are ready for the next part.
3. Setting up our data base
currently our project has been setup but our db is still missing.
if you are using any of the server mention earlier, you can just turn it on and and you get your mysql ready out of the box, however if you are using the php built in, with no mysql, you gonna need to install mysql separately. You can get it from here (https://www.mysql.com/downloads/).
after you get your mysql ready, there are few things that you need from the mysql application in order to connect in with your website.
whats important during db setup is:
- host name // example "127.0.0.1"
- username mysql // example "root"
- password mysql
if you have collected all those essential above.
you can open up any SQL IDE you have :
- phpmyadmin (in your browser, go to http://localhost/phpmyadmin)
- sequelpro (https://sequelpro.com/download)
- heidisql (https://www.heidisql.com/download.php)
- mysql workbench (https://dev.mysql.com/downloads/workbench/)
- more..
as you can see in our project file (on the right side) there is a file "something.sql" , that is the database template design and ready built for this project. Feel free to use is.

you can import this using any method applicable to your SQL IDE, in this example Im going to demo using Sequelpro IDE :
- adding/create our db
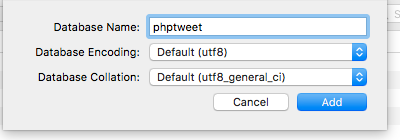
a) click the choose database button (top-left corner of sequelpro)

c) name your database anything you want , in this demo i will name it "phptweet", then click add
- importing our .sql into into our mysql through our Sequelpro IDE (shortcut shift+command+I) or you can click the "File"(top-left window) > select "import"

- find the downloaded .sql inside our project file "phptweet.sql", then click open, the setting be as follows:

- preview our pre-built db for you


Since we can see that the content is empty for both tables, as this is because we haven't register our users and our users haven't tweet anything yet.
4. Wiring our application to our database
in this section there are 4 things necessary for our application to be connected to our database :
- host name // example "127.0.0.1"
- username mysql // example "root"
- password mysql
- database name (as in this demo it is "phptweet")
Now, go to our project file, open a file name "openmysqlconnection.php", this is where the configuration for our application to be connected to our database will happen.

please set the configuration appropriate to your mysql settings.
after you have done this, save and close the script.
5. Deploy/test our application
go to the localhost/login.php and register new user, can give any name you want.

once submitted, you should get a fresh user twitter like below:

try your first tweet :

feel free to explore it.. the rest of the template features onwards.. thank you reading this guide.

4. Wiring our application to our database
in this section there are 4 things necessary for our application to be connected to our database :
- host name // example "127.0.0.1"
- username mysql // example "root"
- password mysql
- database name (as in this demo it is "phptweet")
Now, go to our project file, open a file name "openmysqlconnection.php", this is where the configuration for our application to be connected to our database will happen.

please set the configuration appropriate to your mysql settings.
after you have done this, save and close the script.
5. Deploy/test our application
go to the localhost/login.php and register new user, can give any name you want.


try your first tweet :

feel free to explore it.. the rest of the template features onwards.. thank you reading this guide.


Comments
Post a Comment